Battery switch on travel trailer function is crucial for managing your RV’s power. This guide dives into everything you need to know, from understanding the different types of switches and their wiring to troubleshooting problems and performing essential maintenance. We’ll cover selecting the right switch for your needs, upgrading or replacing an existing one, and understanding related components like fuses and charging systems.
Get ready to become a battery switch expert!
We’ll explore various switch types, their pros and cons, and how to diagnose issues using a multimeter. Safety is paramount, so we’ll detail precautions for working with batteries and switches. By the end, you’ll confidently manage your travel trailer’s power system and avoid costly mistakes.
Understanding Battery Switch Functionality in Travel Trailers
Properly managing your travel trailer’s power is crucial for a successful trip. A battery switch is a key component in this system, allowing you to control the flow of power between your batteries and your trailer’s electrical system. Understanding its function and different types will help you maintain your trailer’s power and avoid potential problems.
Types of Battery Switches Used in Travel Trailers
Travel trailers typically utilize one of two main types of battery switches: single switches and dual battery switches. Single switches are the simplest, offering a single on/off position for your house battery. Dual battery switches, however, allow for more control, often including options to isolate batteries, connect both batteries in parallel, or select a single battery as the primary power source.
Some more advanced systems incorporate digital switches with remote monitoring capabilities.
Typical Wiring Diagrams for a Battery Switch System
A basic single battery system shows a straightforward connection: the battery’s positive terminal connects to the switch, then the switch connects to the positive bus bar powering the trailer’s 12V appliances. The negative terminal connects directly to the chassis ground. A dual battery setup adds complexity. Each battery will have its own positive lead running to the switch.
The switch then provides several output options to control which battery (or both) power the 12V system. A negative bus bar often connects both batteries’ negative terminals for grounding. Always consult a wiring diagram specific to your switch and trailer for precise connections.
Connecting a Battery Switch: A Step-by-Step Guide
Before starting any electrical work, disconnect the negative terminal of your battery to prevent accidental shorts. First, securely mount the battery switch in a convenient, accessible location within your trailer. Next, run appropriately sized wires from the positive terminal of each battery to the input terminals on the switch. Use appropriately sized wire for the amperage of your system.
Then, connect the output terminals of the switch to the positive bus bar that supplies power to your trailer’s 12V systems. Finally, reconnect the negative battery terminals, ensuring all connections are tight and secure. Always double-check your work before turning on any power. Improper wiring can lead to damage to your batteries or appliances.
So, you’re planning a trip? Awesome! First things first: grab some peace of mind with solid travel insurance. Check out Aon travel insurance for options; they’ve got you covered for a lot of situations. Then, if you’re hitting the road in an RV, knowing how the battery switch on travel trailer function works is super important for keeping your fridge cold and lights on.
Understanding your RV’s power system is key to a smooth trip!
Comparison of Battery Switch Types
| Switch Type | Number of Batteries Supported | Features | Pros/Cons |
|---|---|---|---|
| Single Battery Switch | 1 | Simple on/off control | Pros: Simple, inexpensive. Cons: Limited control, no battery isolation. |
| Dual Battery Switch | 2 | Multiple configurations (both batteries, battery 1 only, battery 2 only, off). | Pros: Increased control, allows for battery isolation and charging management. Cons: More complex installation, higher cost. |
| Digital Battery Switch | 2+ | Remote monitoring, often with individual battery voltage readings, sophisticated control options. | Pros: Advanced control, remote monitoring capabilities. Cons: Highest cost, requires more complex installation. |
Battery Switch Maintenance and Safety
Keeping your travel trailer’s battery switch in good working order is crucial for reliable power and preventing potential hazards. Regular maintenance ensures your batteries perform optimally and minimizes the risk of accidents or damage. This section details a recommended maintenance schedule and important safety precautions.
Regular Maintenance Schedule
A simple maintenance routine can significantly extend the life of your battery switch and prevent problems. It’s recommended to inspect your battery switch and connections at least twice a year, before and after extended storage. This involves visually inspecting for corrosion, loose connections, and any signs of damage. More frequent checks might be necessary if you live in a particularly harsh climate or frequently use your travel trailer in demanding conditions.
Additionally, consider lubricating the switch mechanism annually with a suitable lubricant, following the manufacturer’s instructions. This helps ensure smooth operation and prevents premature wear.
Safe Cleaning and Inspection of Battery Terminals and Connections
Before beginning any work on your batteries or switch, always disconnect the negative (-) terminal first. This minimizes the risk of accidental short circuits. To clean corroded terminals, use a wire brush or a specialized battery terminal cleaner to remove any buildup. Baking soda and water paste can also be effective, but ensure thorough rinsing afterwards. Inspect all connections for tightness; loose connections can lead to poor performance and overheating.
Tighten any loose connections with the appropriate wrench, but avoid over-tightening, which can damage the terminals. After cleaning and tightening, apply a thin layer of dielectric grease to the terminals and connections. This prevents corrosion and ensures a reliable connection. Remember to always wear safety glasses and gloves when working with batteries.
Safety Precautions When Working with Batteries and Battery Switches
Working with batteries involves inherent risks. Always wear safety glasses to protect your eyes from splashing acid or sparks. Use insulated tools to avoid electrical shock. Never wear loose clothing or jewelry that could accidentally contact terminals. Ensure adequate ventilation when working near batteries, as they emit hydrogen gas, which is flammable and explosive.
So, you’re planning a trip? Awesome! First things first: get yourself sorted with travel insurance. Check out Aon travel insurance for some solid options; they’ve got you covered for most eventualities. Then, if you’re hitting the road in a travel trailer, knowing how the battery switch on travel trailer function works is key to keeping your lights on and fridge cold.
It’s a simple thing, but crucial for a smooth trip!
If you smell a strong odor of rotten eggs (hydrogen sulfide), immediately stop working and ventilate the area. This indicates a problem with the battery that should be addressed by a professional. Never smoke or use open flames near batteries.
Potential Hazards of Improper Battery Switch Usage and Maintenance
Improper usage and maintenance of your battery switch can lead to several hazards. These include:
- Electrical Shock: Loose connections or corroded terminals can create a risk of electrical shock.
- Battery Fires: Sparks from loose connections or a short circuit can ignite flammable gases released by the battery.
- Corrosion Damage: Corrosion can damage battery terminals, connections, and the switch itself, leading to premature failure.
- System Failure: A malfunctioning switch can prevent your appliances from working correctly, leaving you without power.
- Battery Damage: Improper handling or cleaning can damage your batteries, reducing their lifespan and performance.
Upgrading or Replacing a Battery Switch: Battery Switch On Travel Trailer Function
Upgrading or replacing your travel trailer’s battery switch can significantly improve your camping experience, offering better control and potentially longer battery life. This process, while involving some electrical work, is manageable for those comfortable with basic wiring. Remember to always prioritize safety.Replacing a faulty or outdated battery switch is a straightforward process, but requires careful attention to detail and safety procedures.
Upgrading to a more sophisticated switch can offer benefits such as improved functionality and increased protection for your batteries and electrical system.
Tools and Materials Required for Battery Switch Replacement
Gathering the right tools beforehand makes the job easier and safer. You’ll need a basic set of tools commonly found in any well-stocked toolbox.
- Screwdrivers (Phillips and flathead)
- Wire strippers/cutters
- Crimping tool (for new connectors, if needed)
- Wrench (size will depend on your battery terminals and switch mounting)
- Multimeter (to verify power and connections)
- Electrical tape
- New battery switch (choose the appropriate amperage rating)
- New wiring connectors (if needed)
- Safety glasses
- Gloves
Step-by-Step Guide to Replacing a Battery Switch
Before beginning any work, always disconnect the negative battery terminal. This is crucial to prevent accidental shocks and short circuits.
- Disconnect the Batteries: Disconnect the negative (-) terminal of both your house and chassis batteries. This is the most critical safety step. Leave the positive (+) terminals connected for now.
- Remove the Old Switch: Carefully remove the old battery switch from its mounting location. Take note of how the wires are connected before disconnecting them. Take pictures if necessary.
- Disconnect Wiring: Disconnect the wires from the old switch, noting which wire goes to which terminal. Label the wires if necessary to avoid confusion during reconnection.
- Install the New Switch: Mount the new battery switch in the same location as the old one, ensuring a secure fit. Refer to the manufacturer’s instructions for your specific switch.
- Reconnect Wiring: Connect the wires to the new switch, matching them to their original locations. Double-check your connections against your notes or photos.
- Reconnect the Batteries: Reconnect the negative (-) battery terminals. Turn on the switch to verify functionality. Use your multimeter to check voltage at various points to ensure proper connections.
- Test the System: Test all circuits to ensure the new switch is functioning correctly. Check your lights, appliances, and other electrical systems.
Upgrading to a More Advanced Battery Switch System
Consider upgrading to a more advanced system like a battery combiner or a sophisticated switch with multiple banks and better safety features. These offer enhanced control over your battery systems, allowing for independent control of different battery banks (for example, separating your house batteries from your chassis battery).
Wiring a New Battery Switch: Safety Precautions and Connection Diagrams
Proper wiring is paramount. Incorrect wiring can lead to damage to your electrical system or even fire.
Always disconnect the negative battery terminal before starting any wiring work.
Use appropriately sized wire for the amperage of your system. Too small a wire can overheat and cause a fire.
Ensure all wire connections are secure and properly insulated. Loose connections can lead to arcing and overheating.
Use a multimeter to verify all connections and voltage levels after completing the installation.
A typical connection diagram for a simple battery switch involves connecting the positive (+) terminals of both batteries to the switch’s input terminals, and then a single output from the switch to the main power distribution center of your travel trailer. The negative (-) terminals are connected directly to the chassis and are typically not routed through the switch. Always consult the wiring diagram provided with your specific battery switch for accurate connections.
Battery Switch and Related Components

The battery switch is the central control point for your travel trailer’s power system, allowing you to easily disconnect the house batteries from the rest of the electrical system. Understanding how it works with other components is crucial for safe and efficient RV operation. This section details the function of the battery switch and its interaction with other key parts of your travel trailer’s electrical setup.
A battery disconnect switch acts as a master on/off switch for your house batteries. In the “off” position, it completely isolates the batteries, preventing any discharge, even from parasitic drains (small amounts of current drawn when the system is off). This is vital for preventing a completely drained battery when your trailer is stored for extended periods. Switching to the “on” position connects the batteries to the rest of the trailer’s electrical system, powering lights, appliances, and other devices.
Battery Switch and Charging System Interaction
The battery switch works in conjunction with your charging system, which typically includes a converter (changing AC power from the shore power or generator to DC power for the batteries) and a solar panel (if equipped). When the switch is in the “on” position, the charging system can replenish the batteries. The converter sends DC power to charge the batteries, while a solar panel provides supplemental charging during daylight hours.
The switch acts as a gatekeeper, preventing the charging system from attempting to charge a disconnected battery bank.
Fuse and Circuit Breaker Protection
Fuses and circuit breakers are safety devices that protect the battery switch and the entire electrical system from overloads and short circuits. They are strategically placed throughout the system. A fuse or circuit breaker will “blow” (open) if the current exceeds its rated capacity, interrupting the circuit and preventing damage to wiring and components, including the battery switch itself.
Common locations include the main power line feeding the battery switch and individual circuits for various appliances. For example, a 30-amp circuit breaker might protect the main power feed to the switch, while smaller 15-amp fuses might protect individual lighting circuits.
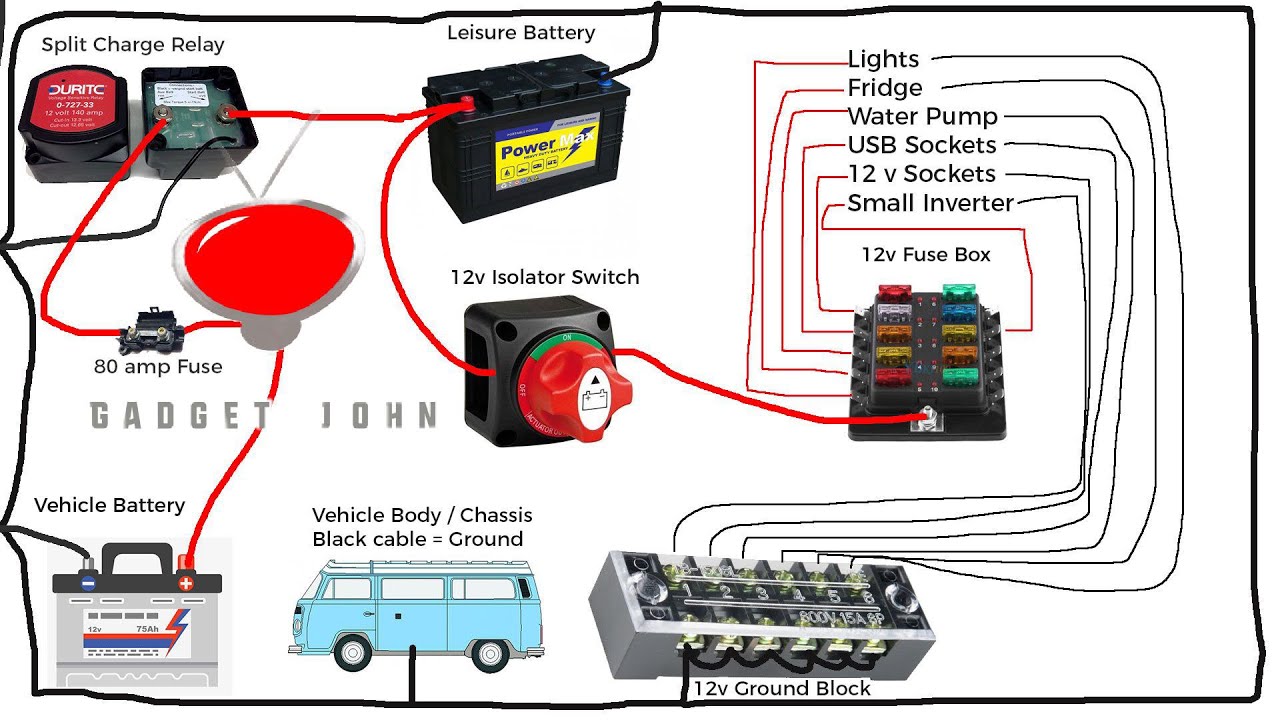
Typical Travel Trailer Electrical System Diagram, Battery switch on travel trailer function
Imagine a diagram showing a 12-volt house battery connected to a battery disconnect switch. From the switch, heavy-gauge wiring leads to a distribution panel. This panel houses various fuses or circuit breakers protecting individual circuits that branch out to different parts of the trailer: lights, water pump, refrigerator, etc. A converter is connected to the AC power input (shore power or generator) and is wired to charge the battery when the switch is “on”.
If equipped, a solar panel is also connected to the battery, providing additional charging capability. The diagram clearly labels the battery, battery switch (with “on” and “off” clearly marked), converter, fuses/circuit breakers, distribution panel, and various loads (lights, water pump, etc.) connected to the panel. The wiring pathways are shown, illustrating the flow of DC power from the battery, through the switch, to the various appliances, and the flow of AC power from the shore power/generator to the converter and then to the battery for charging.
The sizes of the wires and the ratings of the fuses/circuit breakers would also be depicted, illustrating the appropriate sizing for each component to handle the current demands.
Mastering your travel trailer’s battery switch is key to a smooth and enjoyable RV experience. From understanding its function and troubleshooting common problems to performing safe maintenance and selecting the right upgrade, this guide provides a comprehensive approach to managing your RV’s power. Remember, safety first! Always disconnect power before working on any electrical components. With a little knowledge and the right tools, you can confidently maintain and troubleshoot your battery switch system, ensuring reliable power on all your adventures.
FAQ Guide
What size battery switch do I need?
The correct amperage depends on your battery bank’s capacity and the appliances you’ll be running. Consult your RV’s wiring diagram or a qualified electrician for guidance.
My battery switch is clicking but not engaging. What’s wrong?
This often indicates a faulty switch or a problem with the wiring. Check for loose connections, corroded terminals, and blown fuses before replacing the switch.
How often should I inspect my battery switch?
Inspect your battery switch and connections at least once a year, or more frequently if you use your RV extensively in harsh conditions.
Can I use a multimeter to test my battery switch?
Yes, a multimeter can help check for voltage and continuity to diagnose issues within the switch and its wiring.
